Unfortunately, there is no Homematic Skill for Amazon Alexa Voice Service (Amazon Echo). Nevertheless, the Homematic can be controlled very easily with the Echo or the Echo Dot. You can work through these instructions in about 20 minutes. Since we are simulating Hue lamps on the Echo (Alexa can already address these without a Skill), we can unfortunately only switch and dim lights. Other functions such as shutters would also be conceivable, but they have to be controlled with the voice command "switch on light", "switch off light", "dim light" and therefore does not yet offer a perfect solution for this. However, if you only want to switch lights, this is a very well-functioning solution that I would not want to do without.
Initial situation: I have a Homematic (not Homematic IP) with a CCU1 and light actuators connected to it. We also need a Raspberry Pi. I already use it for other things and can easily expand it for this. In addition, an Amazon Echo or Amazon Echo Dot is of course necessary.
The procedure in brief:
- On the Raspberry we install the habridge, an open source Java software which simulates Hue lamps.
- These simulated Hue lamps are recognised by Alexa
- habridge ensures that a freely selected action is carried out when the simulated lamps are switched, in our case we let the XML interface of the CCU be addressed.
- Ready 🙂
Let's start by installing the habridge on the Raspberry Pi:
habridge is a Java software, so we need to make sure that Java is installed on our Pi. This can be done with
sudo apt-get update && sudo apt-get install oracle-java8-jdk
Now we create a new subfolder in our home directory and download it
cd /home/pi/
mkdir habridge
cd habridge
wget https://github.com/bwssytems/ha-bridge/releases/download/v4.1.2/ha-bridge-4.1.2.jar
Next, we create a start file for habridge. In this file we also specify the port on which the web interface should be accessible. I had to change this port because the default port 8080 was already used on my Raspberry Pi:
vi starthabridge.sh
And enter:
cd /home/pi/habridge
rm /home/pi/habridge/habridge-log.txt
nohup java -jar -Dserver.port=8080 /home/pi/habridge/ha-bridge-4.1.2.jar > /home/pi/habridge/habridge-log.txt 2>&1 & chmod 777 /home/pi/habridge/habridge-log.txt
Then we make the start script executable
chmod u+x starthabridge.sh
And start habridge
./starthabridge.sh
Now we check the log file for errors
tail -f habridge-log.txt
If no errors occurred, habridge is now installed and accessible via the port configured above in the web browser.
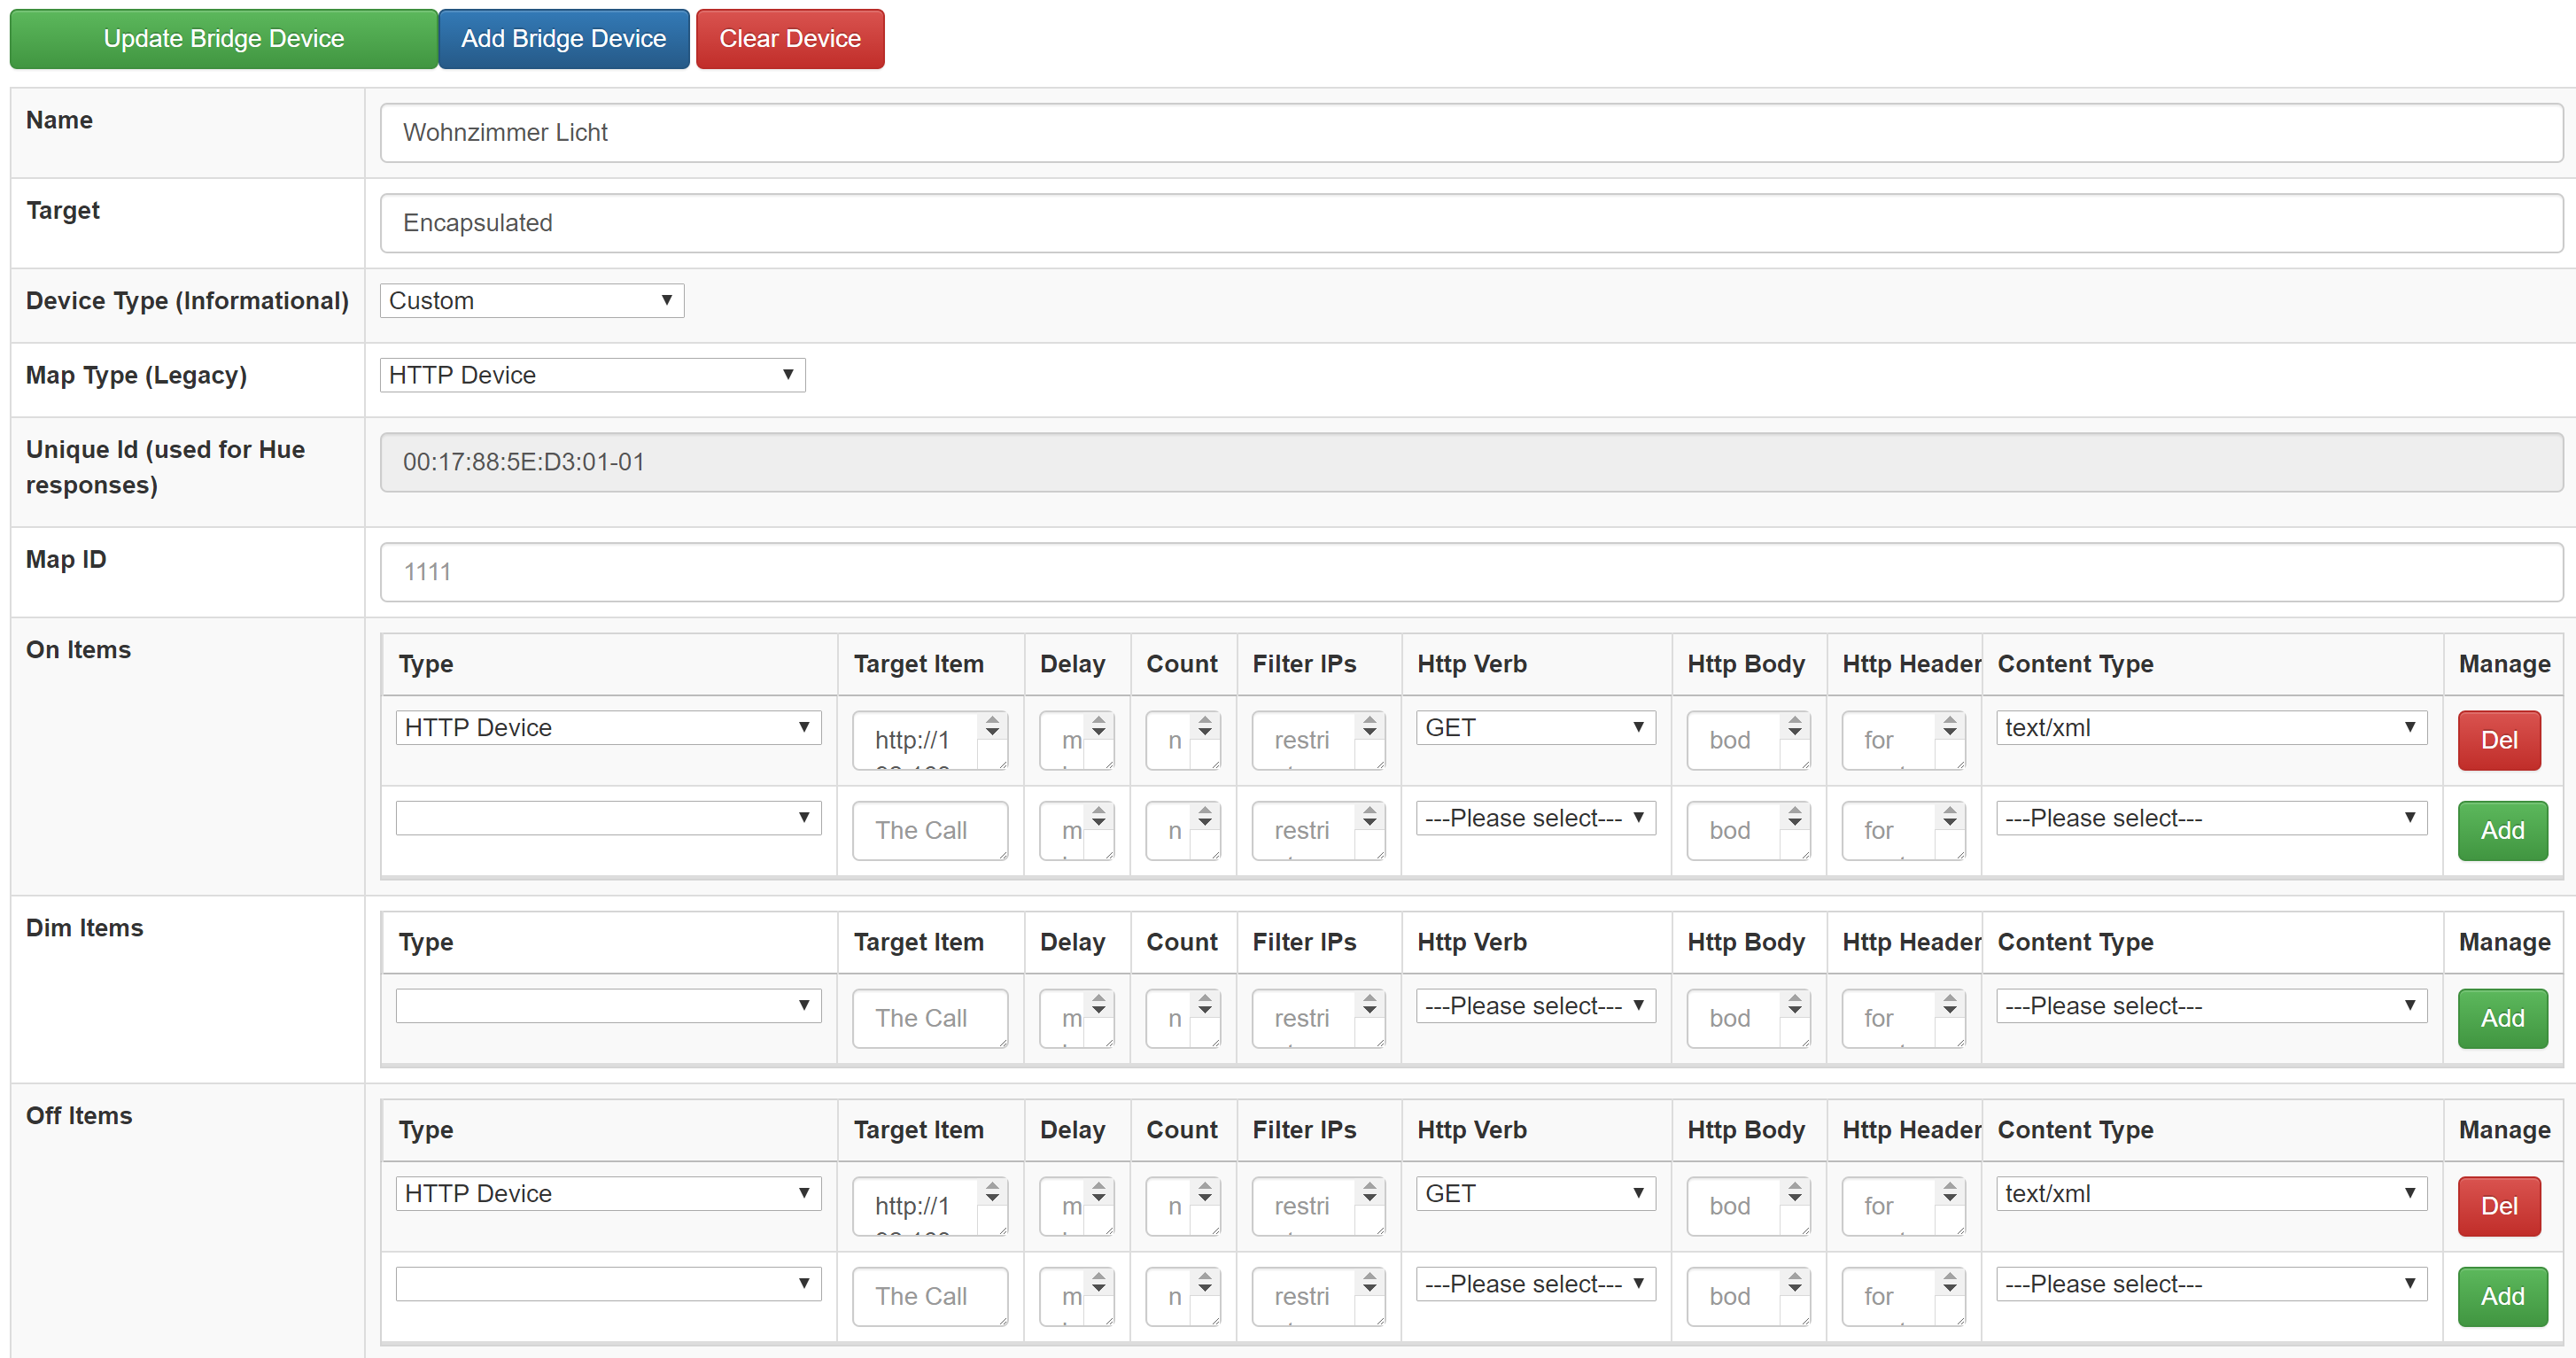
We now call up the web interface. On the start page we see all the devices that Alexa would recognise as Hue lamps. Of course, none of them have been created yet, but we can change this by clicking on "manual add".
We only need a few fields for the installation:
- Name (Alexa will recognise the device under this name, so the name "Living room light" leads to the following voice command "Alexa, switch on living room light")
- Device Type "Custom
- Map Type "HTTP Device
- On Items -> Target Item
- http://[CCU_IP]/config/xmlapi/statechange.cgi?ise_id=[ise_id]&new_value=1
- Off Items -> Target Item
- http://[CCU_IP]/config/xmlapi/statechange.cgi?ise_id=[ise_id]&new_value=0
Note: The XML API addon of the CCU is required for this, which can be found here. The ise_id can be found by calling up the following URL in the browser and then searching for the corresponding device there
http://[CCU_IP]/config/xmlapi/devicelist.cgi
Now we save the configuration. This device has now been set up. We do the same for all other devices / lights that we want to switch.
Finally, we pair the whole thing with Alexa:
We go to the Alexa app, then to Smart Home and scroll all the way down. There we let Alexa search for new devices. This takes a short time and then the setup is complete. The lights can now be switched.


I can't get a connection between ALEXA and HA-Bridge ...
My lamps are set up in HA-Bridge and can also be controlled from there.
But ALEXA does not find any devices. What can I do?
I also had this problem after an update. The setting "UPNP IP Address" under "Bridge Control" was missing. This value must be set to the IP of the habridge.
Thank you for this article - everything works fine. In the meantime, the web interface has changed slightly, but that doesn't detract from it.
What else would interest me: Has anyone ever tried to set a dimming value somehow?
Dimmwerte kann habridge auch entgegen nehmen, dazu musst du in der Url an entsprechender Stelle einen der folgenden Werte einfügen:
${intensity.percent}
${intensity.byte}
Thank you - that doesn't sound bad.
I won't be able to test it until tomorrow, but I have a question in advance: Homatic accepts the dimming values via XML API in decimal points, i.e. 0.2 for 20 percent.
Does that also work?
${intensity.percent} liefert Werte zwischen 0 bis 100. Es gibt zwar eine math() Funktion mit der man das ganze dann teilen könnte, jedoch liefert diese Funktion auch nur Ganzzahlen und ist daher für diesen Anwendungsfall nicht geeignet. Soweit ich weiß gibt es nur die Möglichtkeit mit Hilfe eines Tricks:
http://SomeUrlToCall/dim=0.${intensity.percent}
D
Damit kannst du aber nur von 0.0 bis 0.9 schalten. 100% würde 0.1 ergeben.
Hmpf...I could have come up with that idea too, thanks again 😉
Works great...and I achieve the 100% quite simply through the "On Item".
Die Kommentare sind zwar schon etwas älter, trotzdem mal eine Info:
Ich spiele derzeit parallel zu Carstens HConnect auch mit der HA-Bridge rum. Grund: keine extra Cloud nötig.
Die math()-Funktion kann man sehr wohl auch für Alexa und HM einsetzen. Man muss die nur richtig verpacken. Beispiel:
HM-Rollladen-Aktoren funktionieren ja „anders rum“, sprich, bei 10% sind die fast ganz unten. Das bekomme ich meiner Family nicht verständlich beigebracht.
Somit ist der „Dimmbefehl“ folgender:
http://[CCU-IP]/config/xmlapi/statechange.cgi?ise_id=%5Bise_id%5D&new_value=0.${intensity.math(100-${intensity.percent})}
Damit wird er Wert umgekehrt. Bei „Alexa, Rollladen X auf 10%“ wird der Aktor auf 90% von seinem Wert her heruntergefahren. Der Rollladen ist jedoch nur 10% geschlossen 😉
Hello everyone, I am currently working intensively on an Alexa Homematic Skill. The aim of this skill is to achieve the simplest possible connection between Homematic and Alexa and to bring a little more intelligence into the control. An additional skill will also allow status queries to be made, e.g. Alexa, is the light off everywhere, or Alexa, how is the heating set in the study? The project is still in beta testing and I could still use some really active beta testers. So if you are interested, you can take a look at the following page: https://hconnectweb.azurewebsites.net/ and contact me at hconnect@deike.ccif you are interested.